There are several reasons why your vehicle’s brake system fails and worn-out brake fluid is one of the most common ones. Not only does it decrease the efficiency of your braking system but it can also damage it if you don’t change the worn-out brake fluid for a longer period of time. Read the following article to learn how to replace brake fluid the right way to improve your braking system performance.
That’s why it’s critical to change the brake fluid according to your manufacturer’s recommendations. Have you ever wondered whether you can replace brake fluid without bleeding or not? Let’s discuss everything you need to know about this topic.
Contents
- 1 What is Bleeding?
- 2 So, Can You Replace Brake Fluid Without Bleeding?
- 3 The Right Process to Replace Brake Fluid Without Bleeding
- 3.1 Step 1: Park Your Car on a Level Surface
- 3.2 Step 2: Locate the Brake Fluid Reservoir or Tank
- 3.3 Step 3: Examine Your Brake Fluid
- 3.4 Step 4: Open the Cap
- 3.5 Step 5: Remove the Lid
- 3.6 Step 6: Suck the Brake Fluid Out
- 3.7 Step 7: Add Fresh Brake Fluid to the Reservoir
- 3.8 Step 8: Reattach the Cap to the Brake Fluid Reservoir
- 4 Final Words
What is Bleeding?
Bleeding the brakes refers to the process of removing air from your vehicle’s hydraulic brakes. The valve is opened in this process to allow air to escape under pressure along with some brake fluid. It’s important to note that it’s not a compulsory step to change or add brake fluid to your vehicle.
In fact, the process of bleeding is only carried out when your need drains your brake system reservoir completely by pushing your brake pedal. In other words, you need to perform the bleeding process to get rid of the air that gets into the brake system.
How Does Air Get into the Brake System?
Over time, your brake system can be affected negatively in a number of different ways like worn-out brake fluid and brake pads. The air can also get into the system in different ways. For example, the air can get into the brake system if a new caliper or brake line is installed.
Extremely worn-out brake pads also allow air to get into the system. However, the most common reason behind this problem is heat. If you apply brakes aggressively, the temperature increases, and the brake fluid boils because it’s hygroscopic, which means it can absorb moisture.
The moisture that brake fluid absorbs turns into air pockets when the temperature increases and your brake pedal becomes soft or soggy. That’s when you need to perform the process of bleeding to allow air to escape.
How the Bleeding Process is Carried Out?
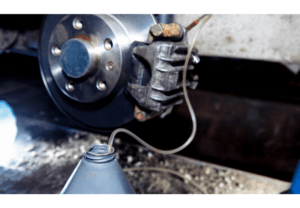
In order to remove air from your vehicle’s brake system, a mechanic opens up the bleeder valve systematically on each caliper. If your vehicle has a drum brake system, then the mechanic will need to open up a bleeder screw on the wheel cylinders.
It allows the air along with some brake fluid to escape from the system. Keep in mind that this job usually requires at least two individuals as someone must need to pump the brake pedal inside the car continuously. However, one person can perform this job alone by using specialized tools.
So, Can You Replace Brake Fluid Without Bleeding?
As mentioned, the bleeding process is only needed to allow the air to escape from the brake system of your vehicle. So, it’s certainly possible to replace or change brake fluid without bleeding.
It’s important to note that bleeding allows you to get rid of air that can affect the performance of your vehicle’s hydraulic brake system. That’s why each brake system should be bled before it’s filled with fresh brake fluid.
The Right Process to Replace Brake Fluid Without Bleeding
A simple way to replace your brake fluid without bleeding is to use a pump to suck all (or most) of the fluid out of your brake system’s master cylinder. You’ll need to make sure that you must not expose the circuit to air while you’re removing the brake fluid from the system.
Once the fluid is out, all you need to do is to top up the brake system reservoir with fresh brake fluid. The only downside to this process is that you’ll need to perform it multiple times over the course of several months if you want to exchange all or most of your old brake fluid.
You can get it done every time you take your car to a mechanic for an engine oil change. The process is very simple and after three to 4 times, almost all the brake fluid will be exchanged. If you want to perform this process yourself, then consider following the steps listed below.
Step 1: Park Your Car on a Level Surface
The first and one of the most critical steps of replacing your brake fluid without bleeding is to place your car on a level surface. You’ll also need to pull the handbrake to make sure that your vehicle is stationary.
It’ll allow you to remove as much brake fluid as possible from the reservoir. In addition, if you just need to check the levels of your brake fluid, a car parked on a steep pitch won’t allow you to get correct brake fluid readings.
Step 2: Locate the Brake Fluid Reservoir or Tank
Once you have parked your car, let it cool. You must not start the process to replace your brake fluid if your engine is hot. Since you’re changing the brake fluid without bleeding, your brake system will have some quantity of old brake fluid.
If the brake fluid is hot, it’ll lead to condensation within your brake system as it cools down. Once your vehicle’s engine is cool, open the hood and locate the brake fluid reservoir.
It’s usually located on the driver’s side of the engine against the back compartment. However, some vehicles have the brake fluid reservoir located under the plastic entrance panel.
Step 3: Examine Your Brake Fluid
If you’re just inspecting, you don’t need to unscrew or open anything if you have a modern vehicle. That’s because most modern vehicles come with a transparent brake fluid reservoir with “Min” and “Max” markings.
If the brake fluid is somewhere between these lines, you won’t need to add or replace your brake fluid. However, you’ll also need to examine the quality of your brake fluid as it becomes contaminated with time.
If your brake fluid is clean, it’ll have light yellow or golden color and you won’t need to change it. On the other hand, if you notice that the color of your brake fluid has changed to dark amber, you’ll need to change it.
Step 4: Open the Cap
Once you have made sure that you need to change your brake fluid, you’ll need to open the cap of the reservoir. You’ll most probably find dirt or grease on the cap and it’s advisable to use a dry cloth to clean it.
It’ll allow you to make sure that no dirt particles make their way to the brake fluid reservoir. It’s a simple yet very critical step that many people overlook.
Step 5: Remove the Lid
Now you’ll need to remove the lid by pulling it straight, releasing the metal spring clip, or simply unscrewing it. Make sure that you perform this step gently because the lid is usually delicate and you don’t want to damage it.
Step 6: Suck the Brake Fluid Out
Now You’ll need to connect your pump to the brake fluid reservoir or master cylinder in order to get as much fluid out as possible. However, if you don’t have the pump you can also perform this step manually by using a big syringe and pipe to take the old brake fluid out.
Keep in mind that you don’t need to change your brake fluid frequently. According to most manufacturers, the brake fluid should be changed after every two to five years depending upon your vehicle and type of fluid.
Step 7: Add Fresh Brake Fluid to the Reservoir
Once you have extracted as much oil brake fluid as possible, you’ll need to start adding the new brake fluid to the reservoir. Make sure that you buy the right brake fluid according to the recommendations of your vehicle’s manufacturer that you can find in the manual.
Best Brake Fluids – Find Out Which One Is the Best for You
Open the bottle of fresh brake fluid and slowly add it to the brake fluid reservoir. Top the fluid until it reaches the full or “Max” mark. It’s important not to add brake fluid to the reservoir beyond that mark.
Step 8: Reattach the Cap to the Brake Fluid Reservoir
Now you’ll simply need to reinstall the brake fluid reservoir cap to its place. Another important factor to keep in mind while removing and adding brake fluid to the reservoir is to make sure that you don’t drop it on your vehicle’s surface.
That’s because brake fluid can react with your vehicle’s paint and can lead it to peel. If you mistakenly drop brake fluid on your car’s paint, clean it with a damp cloth immediately and dry it off using a dry cloth. Brake fluid can do significant harm to your vehicle’s pain within five minutes, so always proceed with caution.
Final Words
You’ll need to perform this step three to four times over the course of a few months in order to replace all or most of your old brake fluid if you don’t want to perform the bleeding process.
However, you can avoid all this hassle by going to a certified mechanic to get your brake fluid checked and replaced during a single visit with bleeding but still, it’s not mandatory.